There are various approaches to stabilizing DAW operation while keeping the audio interface’s ASIO buffer low and preventing audio dropouts (sound interruptions or noise). This time, we will focus specifically on “DPC latency countermeasures,” explaining based on real-world experience.
My production environment is Cubase Pro 14, Windows 10, i5-8400, Rubix22, and GT1030 (as of 2025).
What is DPC Latency?
DPC stands for “Deferred Procedure Call,” and it is one of the mechanisms Windows uses to prioritize and efficiently execute the processing of multiple tasks and device drivers. Simply put, it’s a mechanism where the OS temporarily queues processing that can be “postponed” and executes it after higher-priority processing is finished.
DAW audio signals, by nature, need to be processed continuously at very short time intervals. However, if the OS spends more time than expected on the DPC processing of other device drivers (such as network adapters or USB devices), the audio driver’s processing gets postponed, and data transfer falls behind. This is a state of “high DPC latency,” and it causes phenomena like the following:
- Sound interruptions like pops or clicks
- Clicking noise
- Sound skipping (dropout)
- In severe cases, the DAW or audio interface may not be recognized
These issues have a fatal and serious impact on stable DAW operation, making DPC latency countermeasures important.
Checking DPC Latency with LatencyMon
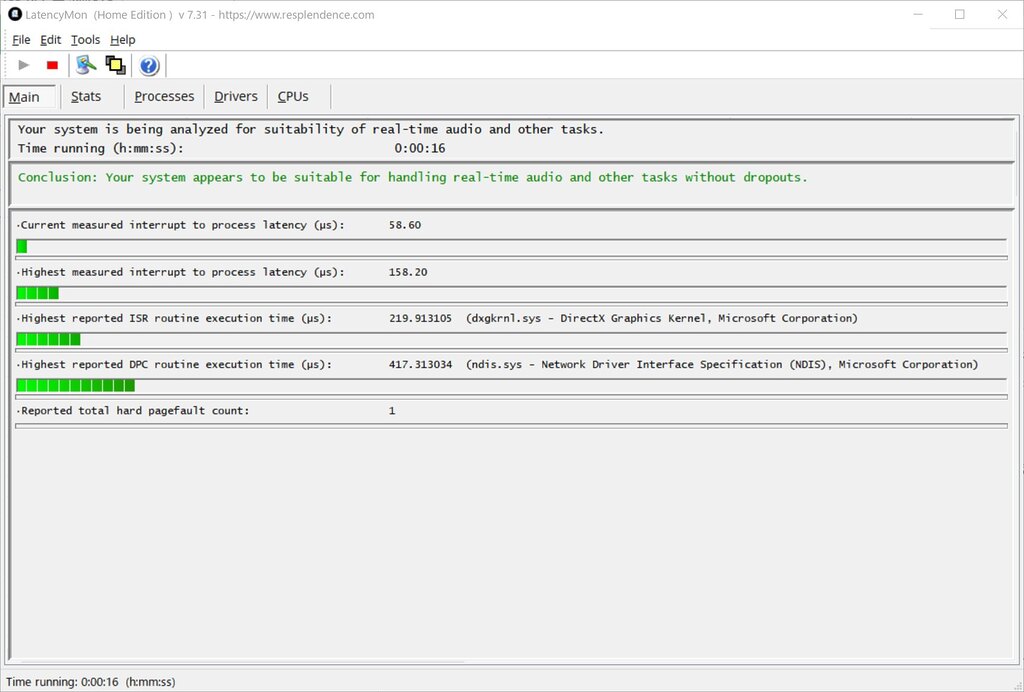
To check DPC latency, you use an application called “LatencyMon.”

If the official website above is not accessible, you may alternatively obtain the software from the mirror download site listed below.

LatencyMon allows you to measure DPC and ISR latency in real-time and identify the device drivers causing significant latency.
The method is to start LatencyMon measurement and operate your DAW as usual for at least 5 minutes. Also, perform the measurement in the “OS idle state” without launching the DAW or doing anything.
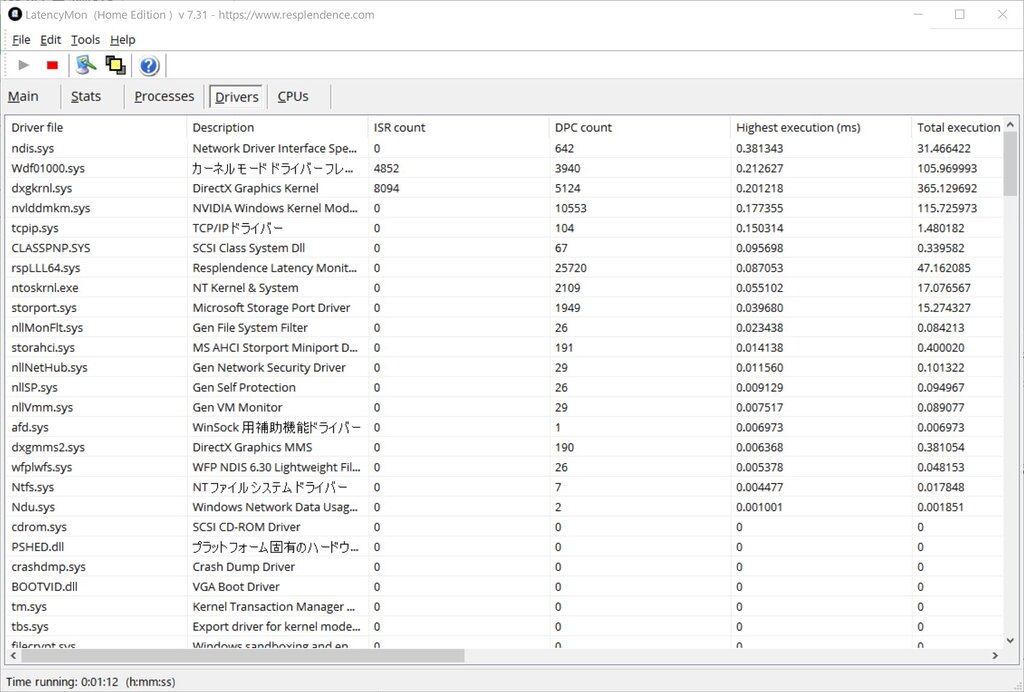
After finishing the measurement, you will proceed with countermeasures for the individual device drivers shown in the Drivers tab.
Native Instruments has published easy-to-understand videos and materials about the series of steps and how to address specific device drivers (with Japanese subtitles), so please refer to them:

Guideline for Acceptable DPC Latency
Once you can grasp DPC latency numerically, it’s natural to feel a desire to keep it as low as possible. However, falling into excessive tuning and neglecting your primary music production goals is counterproductive (this applies to all DAW customization tuning). Therefore, by understanding the benchmark DPC latency values in advance, it should be possible to aim for a moderately stable DAW environment.
Specifically, based on experience, it seems reasonable to consider it OK if the values are within the following ranges and no noise or dropouts occur during normal DAW operation:
- Individual device drivers: 500 microseconds or less
- Total latency value: 1,000 microseconds or less
The place to check the latency of individual device drivers is “Highest execution (ms)” under “Drivers” in LatencyMon.
In my environment (Windows 10, i5-8400, Rubix22, GT1030), after implementing countermeasures, the maximum latency for individual device drivers is around 300-500 microseconds, and the total maximum is around 500 microseconds. Before implementing countermeasures, there were cases where the total value reached about 1,000 microseconds, but even then, no noise or dropouts were observed.
If you are using settings like an ASIO buffer of 64 samples or less, audio dropouts may occur with these guideline values, but with settings of 256 samples or more, it is generally unlikely to be a problem.
Incidentally, at 44.1kHz, the acceptable time for 64 samples is approximately 1,450 microseconds, and for 256 samples, it is approximately 5,800 microseconds.
If the various processes within the DAW and OS, including DPC latency, are completed within this acceptable time, the audio dropout problem will not occur.
Specific Countermeasure Example: Network Adapter (NIC) Settings
In my environment, the latency of “ndis.sys” was significant, frequently exceeding 800 microseconds and sometimes greatly exceeding 1,000 microseconds. The onboard network adapter I am using is “Realtek PCIe GbE Family Controller.” I opened the properties of the network adapter from Device Manager and made the following settings:
- Disable “Interrupt Moderation.”
- Disable Offload (NIC handling checksum processing, etc.).
As a result, I was able to reduce the latency to less than half of the initial value (kept below approximately 400 microseconds maximum during DAW use).
Disabling “Interrupt Moderation”
In this particular case, turning off Interrupt Moderation was particularly effective. “Interrupt Moderation” is a mechanism where, instead of interrupting the CPU immediately every time a data packet arrives, it waits until several packets accumulate or a certain amount of time passes, and then notifies the CPU with a single combined interrupt.
Disabling Interrupt Moderation means that data packet processing is performed as it arrives, which might seem to increase CPU load at first glance. However, with current CPU performance, this is only within the margin of error, and the impact of latency due to waiting for processing is significantly more prominent, leading to large improvements like in this case (in fact, no change in CPU load or power consumption was observed).
Disabling Offload (NIC handling checksum processing, etc.)
Disable the following items:
- IPv4 Checksum Offload
- TCP Checksum Offload (IPv4)
- TCP Checksum Offload (IPv6)
- UDP Checksum Offload (IPv4)
- UDP Checksum Offload (IPv6)
Disabling Offload had a slight effect, but it eliminated cases where Wdf01000.sys and CLASSPNP.sys sometimes caused latency exceeding 1,000 microseconds when Offload was enabled (whether there was a direct connection is unknown).
Originally, offloading checksum processing and such to the NIC should lighten the processing load, but in reality, this is not always the case, and sometimes it causes large DPC latency. The hypothesis for the cause is that to ensure the integrity of IP data, various locks are required within the OS, and this can paradoxically slow down processing.
About Other NIC Settings
Other countermeasures include the following, but no change was observed in my case even after setting them (latency improvement may be seen depending on the environment):
- Disable Large Send Offload (NIC handling large data packet segmentation).
- Disable Receive Side Scaling (RSS: multi-core processing).
- Disable power saving settings.
Incidentally, the NIC’s power saving function switches on/off extremely quickly, and it is considered unlikely that this function affects latency. As no impact was observed in my environment, I keep the power saving function enabled for operational reasons.
Specific Countermeasure Example: Graphics Driver Settings
Another area that led to a significant improvement was the graphics driver settings. Specifically, by turning off “Hardware-accelerated GPU scheduling” in Windows settings, I was able to greatly improve DPC latency. Initially, maximum latency of 700-1,000 microseconds was measured, but after countermeasures, sudden maximum values are around 500 microseconds, and during normal DAW use, it stays within approximately 300 microseconds maximum.
Since I am using an old graphics card designed like the NVIDIA GT1030, this cannot be called a general countermeasure, but I am sharing it because it was very effective.
This setting is enabled by default in Windows 11, so there needs to be a considerable reason to intentionally turn it off. In this case, the imbalance in performance between the CPU and GPU (GPU performance deficiency) might have paradoxically caused load or processing delays on the CPU side. Alternatively, due to the age of the GPU’s design, it is conceivable that the driver or OS is not functioning as intended.
In any case, since there was a clear improvement in measured DPC latency, I operate with “Hardware-accelerated GPU scheduling” turned off in my environment.
About “Hardware-accelerated GPU scheduling”
This feature was released in Windows 10 in 2020. As the name suggests, it offloads a large part of GPU scheduling from the CPU to a dedicated GPU-based scheduling processor. By having GPU scheduling handled by hardware acceleration, the CPU load (GPU scheduling overhead) is reduced, improving performance and system latency in certain processes.
However, in reality, cases where no change in performance is seen using this feature are prominent. The reason is said to be that development programmers had already found efficient ways (optimizations) to handle traditional GPU scheduling and had nearly reached the limits of performance. It is believed that Microsoft’s aim with this feature was not merely for performance improvement, but to modernize the graphics system and pave the way for the future.
Countermeasures for ntoskrnl.sys
If LatencyMon shows significant latency for “ntoskrnl.sys,” identifying the problem becomes difficult. This is because ntoskrnl.sys is the core kernel of the Windows OS itself, and it is difficult to tie it to a specific hardware driver like “this device.”
When ntoskrnl.sys causes DPC latency, it means that the kernel is in a waiting state or processing is taking a long time for one of the following reasons:
- Kernel’s own processing: Processing in the fundamental parts of the OS (scheduling, memory management, process management, I/O management, etc.) is taking time.
- Proxy processing for other drivers or system events: Many drivers interact with hardware and request OS services through ntoskrnl.sys. Therefore, inefficient processing or waiting time caused by other drivers can appear as if ntoskrnl.sys is the culprit.
- Specific system-wide state changes: System-level event processing such as power state transitions, CPU frequency changes, or SMIs (very high-priority interrupts handled by the BIOS) are measured as ntoskrnl.sys activity, resulting in them appearing as latency.
From these points, if ntoskrnl.sys DPC latency is large, the first thing you should address is power-related settings (power saving settings). Review the power saving settings for the CPU and various drivers, and measure changes in latency while individually turning off power saving features.
If you need to use a small ASIO buffer, disabling C-states in the BIOS to enhance performance or setting the OS power management profile to “High performance” are also effective.
Nevertheless, as mentioned above, identifying the cause of ntoskrnl.sys latency is difficult, so it is recommended to aim for a moderate level of latency based on realistic guidelines and be satisfied if it stays within that range. In fact, in my case, the maximum latency of ntoskrnl.sys after countermeasures for NIC and graphics drivers did not significantly exceed 500 microseconds during normal work, so I determined that further countermeasures were not worth the time cost.
DPC Latency Countermeasures ~ Finally
Regarding countermeasures for DAW DPC latency, you can find various detailed information online, starting with how to use LatencyMon. Therefore, in this article, I focused on introducing specific cases in my production environment. I hope the information about actually addressing DPC latency is helpful for improving your environment.