This article focuses on “ASIO-Guard,” a feature Cubase users will have likely encountered.
In DAW-based music production, stable operation and low latency are eternal themes. Especially as projects become more complex, using many tracks and plugins, the battle against CPU load is unavoidable.
This article will provide a detailed explanation of ASIO-Guard, from its basic mechanisms and benefits to its evolution, practical settings, and troubleshooting.
- About ASIO and CPU Load, and the Path to ASIO-Guard’s Introduction
- What is ASIO-Guard? – Basic Mechanism
- Benefits of ASIO-Guard – Why Your Production Environment Becomes More Comfortable
- The Evolution of ASIO-Guard – Its Journey with Cubase
- Practical Techniques and Precautions for Mastering ASIO-Guard
- Summary
About ASIO and CPU Load, and the Path to ASIO-Guard’s Introduction
First, let’s briefly review “ASIO,” which is essential for understanding ASIO-Guard.
ASIO (Audio Stream Input/Output) is a driver standard, primarily for Windows environments, that enables ultra-low latency communication of audio signals between DAW software and an audio interface.
By bypassing the OS’s standard audio functions, it’s possible to minimize “sound delay (latency)” during recording and performance, realizing music production with high real-time responsiveness.
However, modern music production places high demands on computers, with high-fidelity sample libraries, CPU-intensive effect plugins, and a vast number of tracks, constantly requiring as much CPU power as possible.
This increase in CPU load can cause audio processing to fall behind, leading to audio dropouts, clicks, and pops (glitches) – the most undesirable problems in music production.
To address these challenges, Steinberg introduced the groundbreaking technology “ASIO-Guard” in Cubase 7. Its main purpose was to improve overall system stability and build a more robust system against audio processing peaks and unexpected CPU load fluctuations.
What is ASIO-Guard? – Basic Mechanism
So, how exactly does ASIO-Guard enhance system stability? The secret lies in the clever division of processing by Cubase’s hybrid audio engine.
Dividing Processing into Two Paths: “Real-time Path” and “ASIO-Guard Path”
ASIO-Guard processes audio within Cubase by dividing it into two main paths.
Real-time Path
- Audio signals of tracks currently being recorded
- Sound from software instruments being played in real-time with a keyboard
The “real-time path” handles tasks where delay would be critical if not processed “immediately,” such as monitoring input signals.
This path is processed with the small buffer size set in the audio interface, maintaining low latency, as traditionally done.
ASIO-Guard Path
- Playback of already recorded audio tracks
- Playback of programmed MIDI tracks
This path handles “tasks that can be pre-processed,” such as effect processing and plugin instrument sound generation that do not involve real-time input.
A dedicated “larger buffer size” for ASIO-Guard is allocated to this path.
“Pre-processing (Pre-rendering)” Creates Headroom with a Large Buffer
The key to the ASIO-Guard path lies in this “large buffer” and “pre-processing (look-ahead buffering).”
For example, when playing back a track, ASIO-Guard “reads ahead” the audio data for that track slightly before it’s actually sounded, and accumulates the processed results in the large buffer. Imagine it as pre-calculating when the CPU has spare capacity.
This way, even if a sudden spike in CPU load occurs (e.g., another heavy process interrupts), playback can continue without dropouts because of the “processed audio” stored in ASIO-Guard’s buffer.
This is the fundamental mechanism by which ASIO-Guard enhances system stability.
It’s easier to understand if you think of the ASIO-Guard level setting (explained later) as adjusting the size of this “large buffer” (i.e., the degree of pre-processing).
Benefits of ASIO-Guard – Why Your Production Environment Becomes More Comfortable
What specific benefits do we music producers gain by enabling ASIO-Guard?
Drastic Improvement in Stability, Dramatic Reduction in Dropouts and Noise
This is the biggest advantage. Since it absorbs CPU load peaks, dropouts and glitches that frequently occurred before are significantly reduced, allowing you to focus on production without stress.
Ability to Handle More Tracks and Plugins
As the overall system processing efficiency improves, it raises the performance limit even for large-scale projects with many CPU-intensive plugins or a high track count.
Plugins that sound great but are very heavy, such as synthesizers and effectors, may become more usable thanks to ASIO-Guard.
Potential for Effectively Lower Latency During Recording/Monitoring
You might think, “If ASIO-Guard uses a buffer for playback tracks, won’t latency actually increase?” While the ASIO-Guard processing path itself has latency, what’s important is its impact on the “real-time path.”
Because ASIO-Guard takes on the load of non-real-time processing, it creates more headroom in the CPU’s real-time processing capability.
As a result, an indirect effect can be expected: the system becomes more stable even if the audio interface’s buffer size is set smaller than before, ultimately allowing for lower latency during recording and monitoring.
Improved Workflow by Reducing the Hassle of Changing Buffer Sizes
Traditionally, it was necessary to frequently change the buffer size according to the work phase – small for recording, large for mixing.
With ASIO-Guard, tracks requiring real-time input can maintain low latency while other playback tracks prioritize stability, reducing the need to frequently change buffer sizes and allowing you to concentrate more on music creation itself.
The Evolution of ASIO-Guard – Its Journey with Cubase
ASIO-Guard wasn’t perfect from its inception. It has undergone many improvements with Cubase version upgrades. Let’s briefly look back at its evolution.
Cubase 7: The Dawn of ASIO-Guard and Early Struggles
ASIO-Guard was first introduced in Cubase 7, released at the end of 2012. While its concept was revolutionary, initial implementations were reportedly unstable on some PC environments or caused CPU spikes (sudden high load conditions), leading to mixed user reviews.
Notably, it initially only targeted audio channels, with limited benefits for VST instruments. It was a period where both Steinberg and users experienced “teething problems.”
Cubase 8: A Leap Forward with ASIO-Guard 2
With Cubase 8, released at the end of 2014, ASIO-Guard received a major update to “ASIO-Guard 2,” marking a significant turning point.
Support for multi-timbral VST instruments (those handling multiple sound sources within one plugin, like Kontakt or Play) was enhanced, greatly contributing to modern production styles that heavily use these CPU-intensive plugin instruments.
Many users experienced substantial performance improvements, and it was around this time that ASIO-Guard began to establish its reputation as a “usable feature.”
However, to be honest, unstable behavior was still observed, and a strong opinion persisted among some users that “disabling ASIO-Guard is preferable for a stable production environment.”
Subsequent Versions: Continuous Refinements and Detailed Support
Cubase 8.5 saw further performance improvements, and in subsequent versions (Cubase 12, 13, etc.), ASIO-Guard has continued to be refined as a core technology.
A noteworthy addition was the ability to toggle ASIO-Guard on/off for individual plugins. This allowed for flexible responses when compatibility issues arose with specific plugins.
More recently, Cubase 12 is said to have undergone a fundamental overhaul of its audio engine (with automation accuracy improved to sample level), and it is believed that ASIO-Guard’s performance also improved at this time.
Software technology is never perfect, and unexpected issues can occasionally arise with new feature additions or OS changes. However, Steinberg has undoubtedly listened to user feedback and continuously improved ASIO-Guard.
Practical Techniques and Precautions for Mastering ASIO-Guard
Now, let’s delve into specific settings for using ASIO-Guard more effectively, and common problems and their solutions.
ASIO-Guard Level and Buffer Size
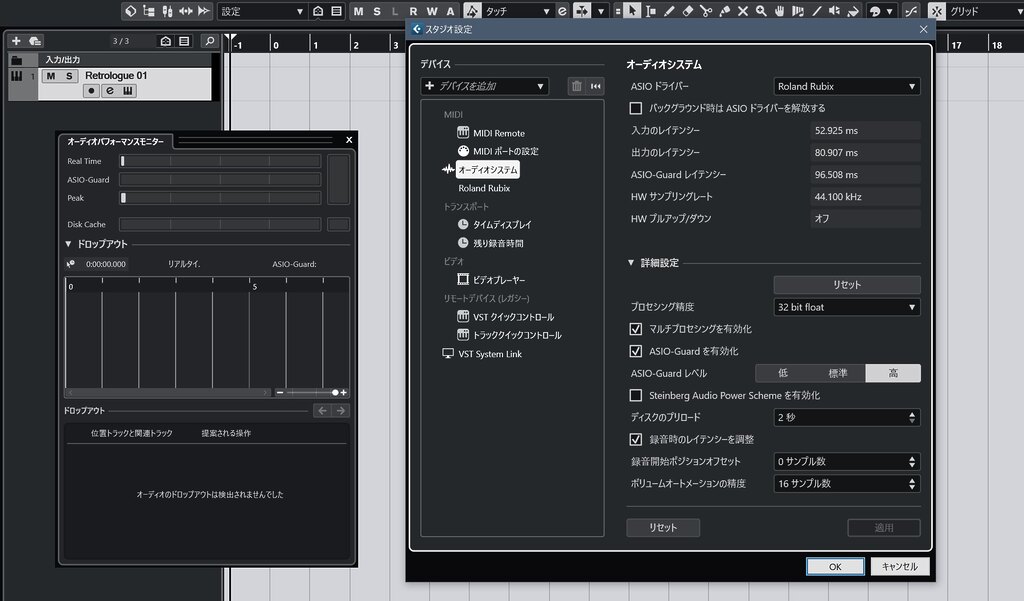
ASIO-Guard settings can be found in the “Audio System” section of Cubase’s “Studio Setup” menu.
ASIO-Guard Level (Low, Normal, High)
This is the most crucial setting. The characteristics of each level are as follows:
| Level | Buffer Size (Relative) | Primary Use Case | Parameter Adjustment Latency |
|---|---|---|---|
| Low | Small | For projects requiring minimal latency or high real-time responsiveness | Low |
| Normal | Medium | For general cases seeking balanced performance | Medium |
| High | Large | For prioritizing stability or very high CPU load, large-scale projects | High |
Generally, it’s good to start with “Normal” and switch to “High” if you experience dropouts in CPU-intensive projects.
Setting it to “High” increases stability and the number of usable plugins, but you may notice a slight delay in response (due to ASIO-Guard’s pre-processing) when adjusting parameters like volume faders on playing tracks.
In my case, I always use “High” to ensure sufficient stability and to use more plugins. With this setting, clicks and dropouts are almost non-existent, especially in projects that use many orchestral libraries, making the benefits of ASIO-Guard Level “High” quite noticeable.
I rarely need to make critical real-time parameter adjustments during production, so I haven’t encountered any problems with this setting.
Relationship with Audio Interface Buffer Size
ASIO-Guard has its own buffer, separate from the buffer size set on the audio interface (which determines the real-time path latency).
Remember that enabling ASIO-Guard can allow for stable operation even with a smaller audio interface buffer size than previously possible.
For example, a project that was only stable at 256 samples might run smoothly at 128 samples by setting ASIO-Guard to “Normal” or “High.” This can reduce monitoring latency during recording.
ASIO-Guard Not Applied to Output Buses by Default
It’s not widely known, but when creating a new file in Cubase, ASIO-Guard is not applied to the output buses in the MixConsole.
Therefore, if any plugin effects are inserted on the output buses, those effects will undergo CPU-intensive real-time processing.
This “ASIO-Guard on output buses” issue is a known Cubase problem (a specific behavior) acknowledged by Steinberg, but they have also officially announced countermeasures. Please refer to the following article for how to address it (Note: Link is in Japanese).
Common Problems and Solutions (Troubleshooting)
While ASIO-Guard is a very powerful feature, it’s not a panacea. Here are some common problems reported by users, primarily on the official Steinberg forums, and hints for resolving them.
Problem 1: System becomes unstable or produces noise when using specific plugins
Cause: Some plugins (especially older ones or those with special processing) may not be compatible with ASIO-Guard’s pre-processing. Famous examples from the past include reported cases requiring workarounds with FabFilter Pro Q2 (possibly improved now) and Vienna Ensemble Pro (VE Pro).
Solution: In Cubase’s “Plug-in Manager,” try disabling ASIO-Guard individually for the problematic plugin. This will force the plugin to always operate on the real-time path.
*Especially for Vienna Ensemble Pro, VSL (the developer) officially recommends turning ASIO-Guard off individually. This is because VE Pro itself performs look-ahead buffering similar to ASIO-Guard, and having both active can cause conflicts.
Problem 2: Cubase’s performance meter (especially the ASIO-Guard meter) maxes out even when overall PC CPU usage is low
Cause:
- Cubase’s meter is different from the OS’s CPU meter:
Cubase’s performance meters (Average Audio Processing Load, Real-time Peak, ASIO-Guard) show more specialized indicators like audio processing real-time status and buffer conditions, not just CPU usage, and are distinct from the OS’s CPU meter. - Single-core bottleneck:
While multi-core processing is common in modern applications, some DAW processes can concentrate load on a single CPU core. For example, a single channel strip with many inserted plugins. Even if the overall OS CPU usage seems fine, if one specific core reaches its limit, it can manifest as dropouts, glitches, or ASIO-Guard overload.
Solution:
- First, try increasing the ASIO-Guard level.
- Consider distributing the processing of heavy channels across multiple tracks or using the Freeze function.
- Use tools like LatencyMon (discussed later) to check and address system-wide latency issues.
Problem 3: Noticeable delay in automation or parameter adjustments during playback when ASIO-Guard level is “High”
Cause: This is by ASIO-Guard’s design. At the “High” level, more audio data is pre-processed, causing a slight delay before real-time parameter changes are reflected in the sound.
Solution: When writing detailed automation before mixdown or performing aggressive real-time parameter manipulations, consider temporarily lowering the ASIO-Guard level to “Normal” or “Low.” Alternatively, getting used to this slight delay is also an option.
Problem 4: Unexpected behavior after a Cubase version upgrade or with specific projects
Cause: The possibility of a software bug cannot be ruled out. In the past, there were reports on official forums of issues like ASIO-Guard being internally disabled in certain versions or performance degradation compared to previous versions.
Solution:
- First, try applying the latest minor update for Cubase.
- Check official Steinberg forums and user communities for similar reported cases.
- As a temporary measure, try changing ASIO-Guard settings only for the problematic project or identifying and disabling problematic plugins.
- In some cases, resetting project settings or preferences might help (backup beforehand is recommended).
Problem 5: Noise or instability during multi-channel recording
Cause: ASIO-Guard divides processing between the real-time path and the ASIO-Guard path. When recording many channels simultaneously, ASIO-Guard’s processing can sometimes become a bottleneck.
Solution: For multi-channel recording, what’s needed is CPU processing power for the real-time path. Try turning ASIO-Guard off completely and see if that stabilizes operation. Community reports suggest that disabling ASIO-Guard has improved such situations.
Differences in Behavior Between Mac and PC
As mentioned in the official help documentation at the time, ASIO-Guard was originally considered to provide greater benefits in Mac OS X (now macOS) environments. This is partly due to differences in OS audio architecture (CoreAudio vs. ASIO drivers).
However, nowadays, if a Windows system is properly optimized, the benefits of ASIO-Guard can be fully experienced. Rather than platform differences, individual PC configurations, driver quality, and OS setting optimization levels have a greater impact on performance, so there’s no need to worry about Mac vs. Windows differences.
Leveraging ASIO-Guard with System-Wide Optimization
To maximize ASIO-Guard’s performance, not only Cubase settings but also overall PC system optimization is crucial.
Latest and Appropriate Audio Interface Driver
It’s fundamental, but always download the latest driver for your audio interface from the manufacturer’s official website and install it correctly.
As a precaution, check in Studio Setup that your audio interface’s dedicated ASIO driver is selected. If a generic ASIO driver or Cubase’s built-in ASIO driver is selected, your interface may not be performing to its full potential.
OS Power Settings
For Windows, setting it to “High performance” or enabling Steinberg’s “Steinberg Audio Power Scheme” can prioritize CPU processing power for audio tasks, helping to prevent dropouts.
This is to suppress CPU power-saving features, preventing a decrease in real-time processing capability due to CPU clock speed fluctuations. Note that this will increase power consumption and CPU heat as power-saving features are disabled.
Managing Background Processes
Unnecessary resident software or applications running in the background can consume CPU resources and interfere with audio processing. Close or temporarily disable them as much as possible during music production.
Many apps, like Google Drive, OneDrive, or social media apps, continue running in the background even if you don’t think you’ve launched them, so it’s recommended to check all their settings.
Also, some utility software claiming to improve PC performance might actually hinder audio processing, so close them.
Security Software Settings
In modern music production PCs, internet connectivity is almost essential for DAW and plugin authorization and license management. Therefore, installing security software is also necessary.
However, DAW audio file processing and security software operations often don’t mix well, usually degrading Cubase’s performance. It’s crucial to exclude Cubase and its related files from security software scanning.
The following article explains this “security software exclusion setting” using Windows’ standard security software as an example (Note: Link is in Japanese).

DPC Latency Check (Windows)
Use a tool like “LatencyMon” to check if high DPC latency (delays in interrupt processing that cause latency) is being caused by a system driver. If a specific driver (e.g., an old network card driver) is causing high latency, updating or disabling it can lead to dramatic improvements.
This is a somewhat advanced countermeasure, but it’s worth trying if you’re plagued by unexplained noise or dropouts.
The following article details DPC latency countermeasures based on my personal experience (Note: Link is in Japanese).
Summary
This article has delved into Cubase’s important ASIO-Guard feature, covering its mechanism, benefits, history, specific settings, and troubleshooting.
ASIO-Guard:
- Dramatically improves system stability, reducing dropouts and noise
- Enables the use of more tracks and plugins
- Indirectly contributes to lower latency during recording and monitoring
is an indispensable technology in today’s complex music production.
However, it’s also necessary to understand aspects such as:
- A slight delay may occur when adjusting parameters on playback tracks
- It’s not perfectly compatible with all plugins or external hardware
- Temporary issues may arise depending on the Cubase version or environment
This can be seen as a matter of how to balance the trade-off between “real-time responsiveness” and “processing headroom (stability)” within the ASIO-Guard framework.
It’s important to understand that “ASIO-Guard is not a magic wand.” No matter how excellent the technology, it cannot extract performance beyond the physical limits of your PC. It’s best viewed as an “assist feature” for efficiently using limited resources and enhancing stability.
By correctly understanding ASIO-Guard’s mechanism, knowing its benefits and limitations, and intelligently configuring and utilizing it according to your environment, music production in Cubase should become significantly smoother and more creative.
The content introduced in this article is merely a general guideline; the ultimate “correct answer” lies within your environment. Try various things and find the settings that work most comfortably for you.
I hope this article helps improve everyone’s production environment.