While many recognize the convenience of Expression Maps, they have long been a prime example of a feature many would rather not spend time configuring.
At least, that was the case for me. I remember feeling a bit overwhelmed when I first realized the time it took to grasp the grouping logic, and the structural headache of seeing the number of sound slots explode exponentially as combinations increased.
Nevertheless, I continued to use them because the convenience of visually managing articulations within the Key Editor far outweighed the initial effort.
Now, with Cubase 15, Expression Maps have finally been revamped.
In this article, I will review the updates and explain the improvements and potential pitfalls from a creator’s perspective.
Expression Maps: What Has Changed?
According to Steinberg’s official announcement, the improvements can be summarized into four major points:
- Significant improvement in the usability of the editing interface.
- Individual adjustment of playback timing and keyswitch triggering.
- Redesigned group display in the Controller Lanes.
- Simplified use of grouping via the new “Add-on” sound slot feature.
Let’s take a closer look at each.
Improved Interface for Drastically Better Efficiency
Since their introduction in Cubase Pro 5 (released in 2009), Expression Maps had remained largely untouched. Despite their acknowledged utility, their reputation suffered due to poor usability.
However, this update finally introduces essential editing operations, such as copy-pasting and bulk editing of settings.
In particular, the ability to multi-edit sound slots and settings—along with copy-paste functionality—allows for the quick and easy configuration of complex, high-volume articulation sets.
To be honest, it feels like this update is long overdue. But perhaps because it was “long-awaited,” the resulting operational feel is excellent.
Articulation-Specific Timing Adjustments
If you have ever worked with orchestral libraries, you have surely faced the issue of attack timings shifting slightly depending on the articulation.
For instance, even if you program Sustains and Staccatos on the same grid, they will sound at different timings. You might want Sustains to trigger slightly early for legato context, while Staccatos should land exactly on the beat.
Previously, this required either manually shifting individual notes or using the Logical Editor—both of which are tedious, reactionary methods that become inefficient when the tempo changes.
While some approach this by splitting articulations into different tracks, that brings its own set of complications.
In Cubase 15, you can now adjust the playback timing and keyswitch trigger timing for each articulation individually in milliseconds. Since this is a time-based adjustment at the Expression Map level, the timing will automatically follow any tempo changes once set.
The value of not having to manually fix timing and volume differences between articulations like staccato and sustain is something every creator who uses multiple articulations daily will immediately appreciate.
Understanding Timing Adjustment Behavior
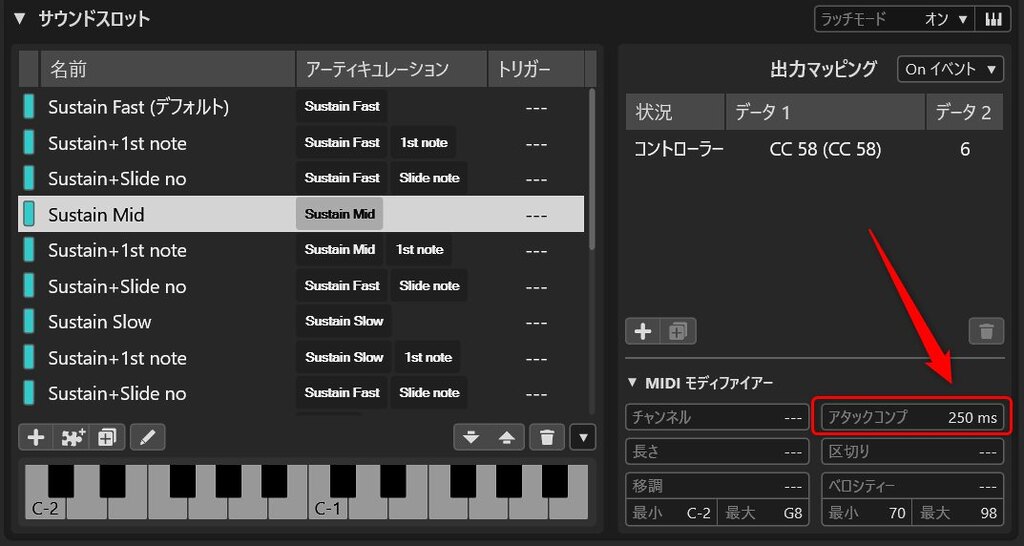
Timing adjustment is performed in the area highlighted in red in the image above. The note-on timing will be advanced by the specified number of milliseconds.
One point of caution: since the note-off timing shifts forward along with the note-on, you may need individual adjustments to ensure notes end exactly when intended.
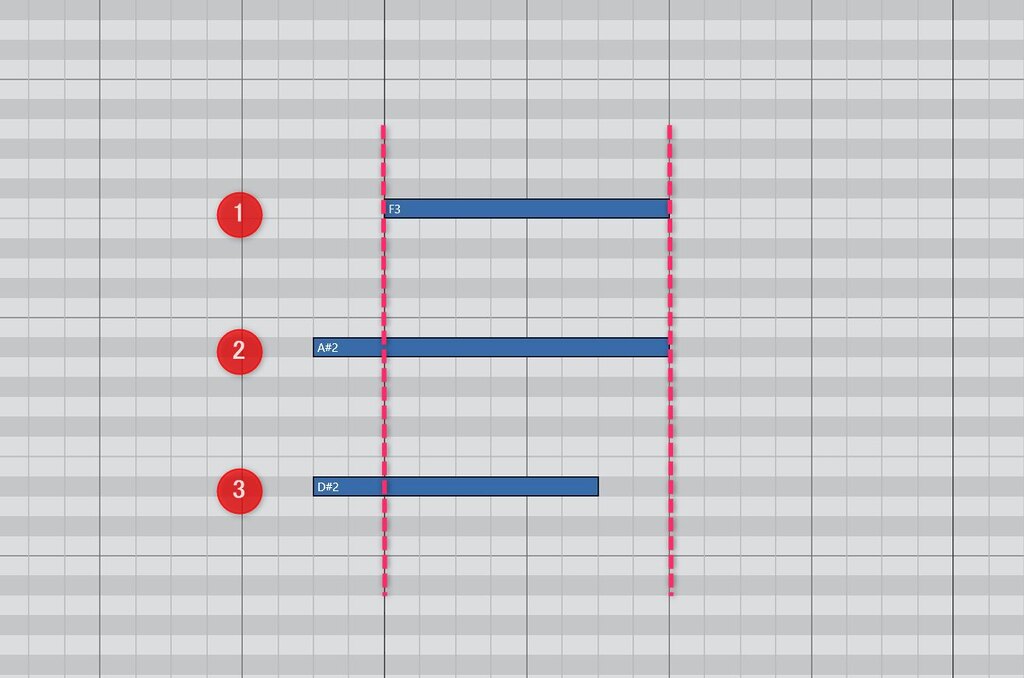
In the diagram, “No. 1” represents the original note data. Applying the timing adjustment shifts it forward to the state of “No. 3.”
If this note were at the end of a phrase, you might prefer the state of “No. 2,” but because the note-off also shifts forward (as in No. 3), the sound may stop earlier than expected.
To handle this, you can either adjust the timing by ear for that specific spot, use the Logical Editor, or—as discussed later—create a Sustain Pedal group using the “Add-on” feature to specify timing.
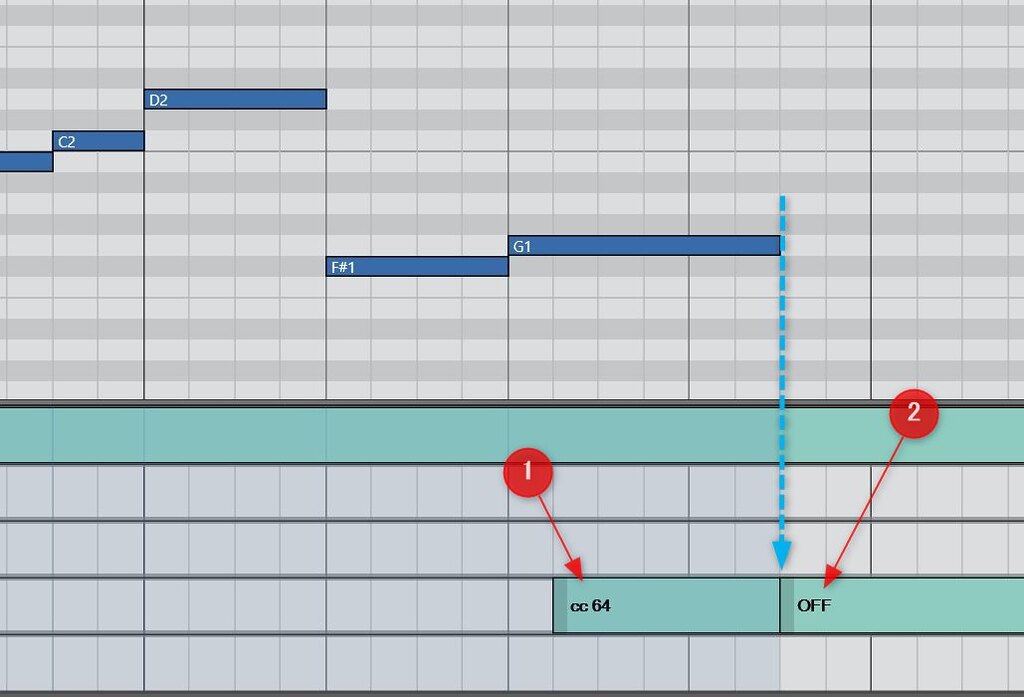
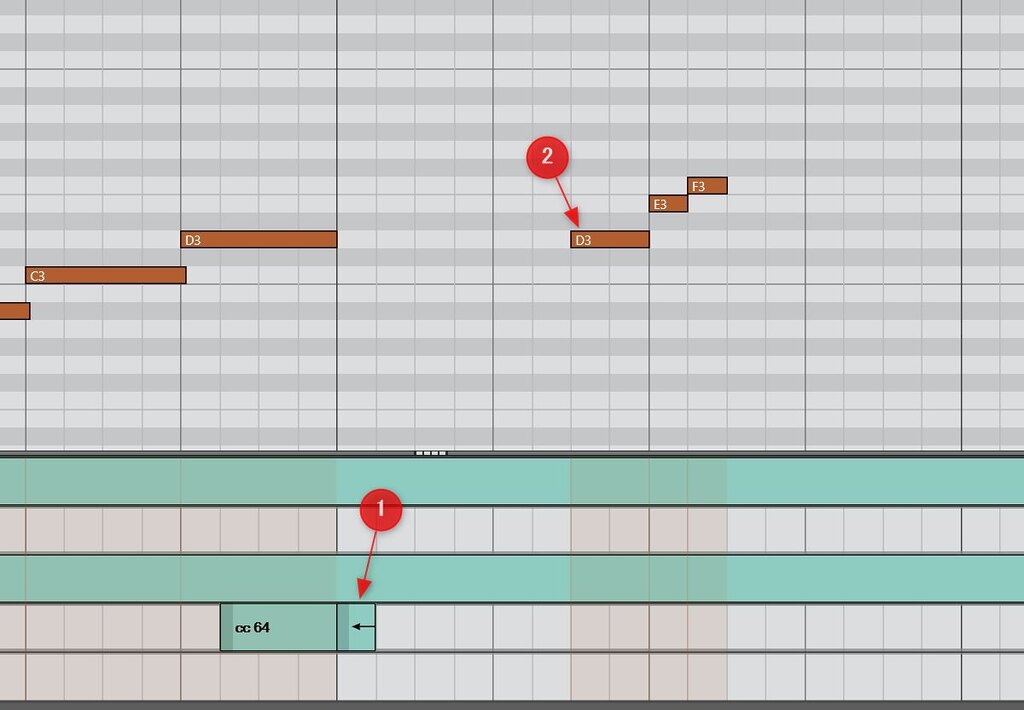
The image above shows the end of a legato phrase.
Each of these notes has its note-on timing shifted forward by Expression Map settings, which, as mentioned, also shifts the note-off timing.
In this case, I send a Sustain Pedal ON message only for the final note (red arrow #1) and send the Pedal OFF message at the notation-defined timing (blue dotted arrow) to stop the sound. This effectively overrides the premature note-off (red arrow #2).
Personally, I find this sustain pedal approach to be the better solution currently, given its ease of editing and visual clarity.
The “Off Event” in Output Mapping
A new feature in this update is the addition of “Off Event” settings in Output Mapping.
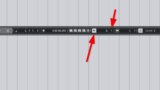
By clicking the red arrow in the image below, you can toggle to the “Off Event” settings.

Starting with this version, you can now issue a “Reset” command for articulation instructions in the Controller Lane. This command works in tandem with the “Off Event.”
When “Reset” is triggered, the “Off Event” configured for the preceding sound slot is output.
This allows for instructions like toggling Mutes or Legato on and off to be handled within a single sound slot, resulting in a cleaner display and simpler operation.
[Note] The Relationship Between Off Events and Acoustic Feedback
A minor but important point: MIDI data triggered by Off Events currently does not seem to reflect in “Acoustic Feedback” (the preview sound played when selecting or moving notes).
Here is an example:
At red arrow #1, a command is issued to reset the previous “CC 64” articulation (Sustain Pedal ON), which sends a Sustain Pedal OFF message.
Naturally, during normal playback, notes following red arrow #2 are played with the sustain pedal off.
However, when you select notes after red arrow #2 manually, the preview sound remains sustained and won’t stop until you move the note or start playback.
This also occurs between adjacent MIDI parts. It suggests that MIDI “chasing” (the consistency check of preceding MIDI data) is not being applied to the Reset function during preview.
Note that this issue does not occur if you create a “Dedicated OFF Articulation” instead of using the Reset function. If preview behavior becomes a problem, consider avoiding the Reset function.
Improving Grouping with “Add-on” Sound Slots
The “Grouping” feature—a mechanism for combining multiple articulations for complex instructions—has existed since the debut of Expression Maps.
For example, a matrix-style setup where you combine various playing techniques with mutes was possible through this grouping function.
However, the configuration interface was, frankly, poor, and editing features were weak, making it a high hurdle for most users.
Building a complex map using groups caused the number of sound slots to explode due to the “multiplicative combination” of settings, and the UI simply couldn’t keep up.
For example, a map with 15 individual articulations, 2 variations (like Mute/Damper ON/OFF), and 3 types of technique changes would require 90 sound slots. A map with 25 base articulations and 25 ornaments would require a staggering 625 slots—virtually impossible to manage manually.
The bigger problem was the gap between the user’s conceptual model of how grouping should work and the actual implementation. Many users found it too daunting to master, making its benefits hard to appreciate.
In this update, the addition of “Add-on Sound Slots” allows for “combined articulation instructions” in a much simpler form.
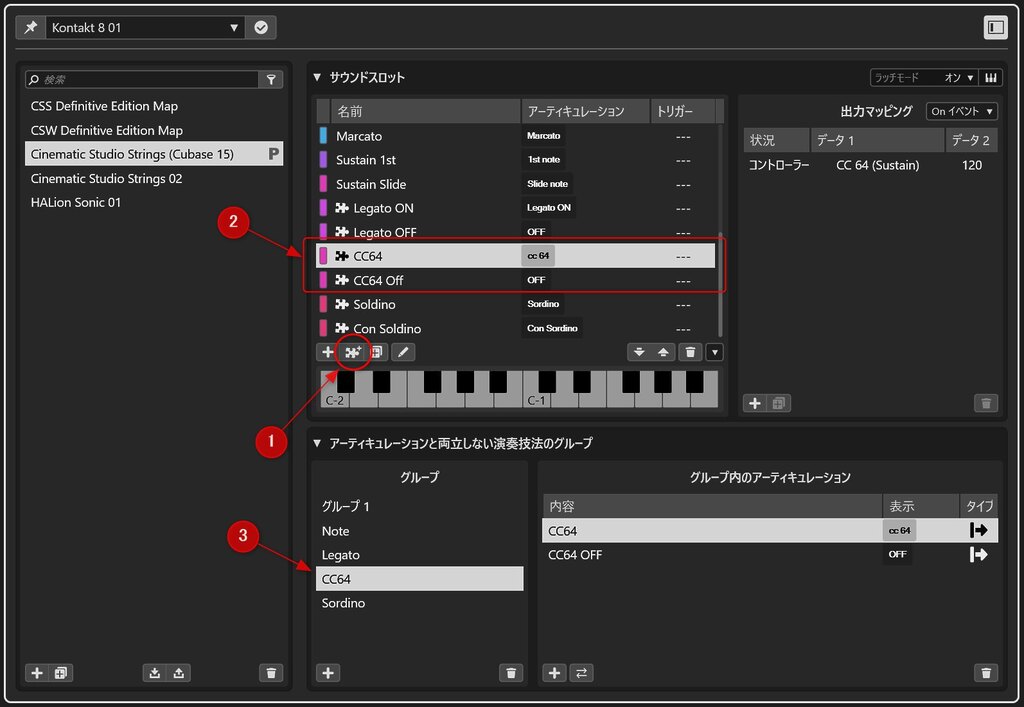
To use an Add-on, first click red arrow #1 to add an “Add-on Sound Slot.”
When you select an articulation (or create a custom one), a sound slot with a puzzle piece icon appears. You then apply the output mapping here.
In the image above, I created new Add-on sound slots for “CC64” and “CC64 Off” and assigned custom articulations named “CC 64” and “OFF” (red arrow #2).
Next, create a new group and move these articulations into it (red arrow #3).
With this, you can now combine instructions from Group 1 and Group 2.
In the Key Editor’s Controller Lane, simply selecting an articulation from each group will combine the output mappings for playback.
UI Refinement for Articulation Grouping
Another new feature is the improved display of articulations in the Key Editor’s Controller Lane, which now allows for expanding and collapsing each group.
Previously, all articulations were listed vertically. If many were registered, you had to widen the lane significantly, which cramped the note editing area and reduced visibility.
In some cases, the lane became so small that articulation names were unreadable, reaching the limits of practical use.
With the update, the ability to expand and collapse groups allows even libraries with massive articulation counts to be displayed clearly.
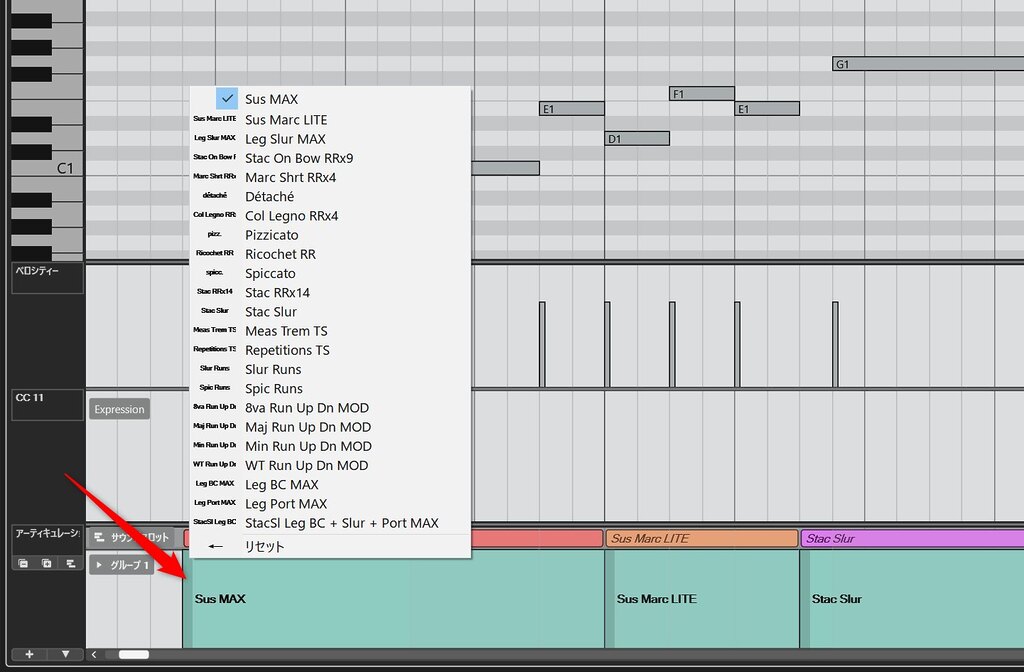
The image above shows the groups in a collapsed state. Clicking the “red arrow” on an articulation allows you to view and select from the group’s list.
Additionally, by holding down the Ctrl key and using the mouse wheel on the left edge of the articulation, you can cycle through the articulations sequentially without displaying the dropdown menu.
This significantly boosts visibility and efficiency when working with massive libraries like EastWest’s “Hollywood Orchestra” or Spitfire Audio’s “BBC Symphonic Orchestra.”
Additionally, a dedicated lane showing color-coded articulation names further improves visual clarity.
Final Thoughts
Expression Maps have always functioned as a “translation layer between the language of the score and the language of MIDI.” The goal was to allow composers to input articulations intuitively while the map handled the technical MIDI details.
This intent has been clear since their inception, given their integration with Cubase’s Score Editor.
With this update, the convenience and precision of that translation layer have clearly reached a new level.
Timing adjustments per articulation allow musical intent to be reflected more faithfully in MIDI data. Color coding and group collapsing help creators stay focused on musical ideas. And Add-ons make complex instructions much easier to grasp.
None of these are just “feature bloat”; they are improvements that support the quality of production. In a sense, by refining the “packaging” of existing functions, Steinberg has finally allowed their full potential to be realized.
Expression Maps are a core feature for any complex production in Cubase. I look forward to seeing them continue to evolve in future versions.
Related Articles