This article explains how to achieve the following audio routing completely free of charge, without relying on hardware loopback functions or virtual mixer software.
- Send and stream Cubase’s ASIO audio to OBS Studio
- Record and play back YouTube or Spotify audio (desktop audio) directly within Cubase
Traditionally, achieving this in a Windows environment meant keeping complex virtual mixer software like “VoiceMeeter Banana” running in the background, forcing you to wrestle with convoluted patching screens.
Alternatively, you might have considered upgrading to an audio interface equipped with a hardware “loopback” feature.
However, virtual mixers inherently carry the risks of CPU overhead and ASIO driver conflicts, while buying new gear solely for a loopback function can be a painful expense.
The solution that eliminates all these headaches at once—and does so completely for free—is the Sessionwire Plugin Suite, which I will introduce today.
With Sessionwire, absolutely no background software or physical loopbacks are required. Using only DAW plugins and your OS’s virtual drivers, you can establish smooth, seamless communication between your desktop audio and Cubase (ASIO).
I highly recommend integrating this “simplest, lowest-overhead routing” into your own Cubase environment.
Official Download URL
Please obtain and install the “Sessionwire Plugin Suite” from the official download page below.
For Those Who Want to Jump Straight to the Setup
Link Click here for the OBS streaming setup
Link Click here for the desktop audio recording setup
Key Features of Sessionwire
Until now, external virtual mixers like “VoiceMeeter Banana” have been the industry standard for routing and streaming DAW audio on Windows. However, if you have actually used these tools, you have likely encountered the following drawbacks:
- Complex Mixer Interfaces:
It is difficult to intuitively distinguish inputs from outputs, making routing a chore. It is incredibly easy to get lost whenever a setting needs adjusting. - Cluttered Configuration Management:
Because the mixer software must constantly run in the background, audio paths and configuration options multiply, making the management of your entire system prone to clutter. - ASIO Driver Issues:
Depending on how it interacts with your ASIO driver—the heart of the DAW—you may experience audio dropouts, noise, or latency issues. Furthermore, configurations relying on the external mixer’s proprietary ASIO driver add layers of complexity to setup and troubleshooting.
Admittedly, virtual mixer software like VoiceMeeter Banana has its distinct strengths. For intricate routing utilizing numerous virtual inputs and outputs, or for building a unified mixing environment across multiple applications, it remains a powerful option.
On the other hand, if your primary goal is simply the integration of Cubase, OBS, and desktop audio—as discussed in this article—you often do not need that level of multi-channel flexibility.
The Sessionwire Plugin Suite eliminates the need for background software mediation altogether, delivering a much clearer, more streamlined routing experience.
How It Works: Directly Connecting DAW (ASIO) and OS (Desktop Audio)
Sessionwire’s architecture is simple and elegant. Upon installation, system-level virtual audio drivers (such as “To SW” and “From SW”) are added to your PC. From there, all you have to do is insert a VST3 plugin inside Cubase.
The plugin (inside the DAW) communicates directly with the virtual driver (on the OS side), seamlessly bridging the audio signal.
This means you never need to open an external mixer window or keep heavy software running in the background. You also do not have to switch your DAW’s primary ASIO driver.
You gain an incredibly clean, low-overhead environment where the routing simply functions as a plugin within your normal DAW workflow.
Completely Free, Yet Professional-Grade Quality
Despite providing such a robust infrastructure, the Sessionwire Plugin Suite is offered entirely free of charge.
Furthermore, it requires no individual account logins, session link generation, or tedious licensing agreements. Just download and install, and it functions standalone immediately.
Moreover, being free does not mean compromising on audio fidelity. The transmitted audio utilizes an uncompressed stereo format at 48kHz, 32-bit floating point.
“I want to keep things smart and contained within my DAW without launching extra software” — Sessionwire fulfills exactly this desire for modern creators.
Since it operates correctly even in projects with sample rates other than 48kHz, it is likely that some form of real-time sample rate conversion occurs internally.
For reference, in my own 44.1kHz environment, I have not experienced any increased CPU load or audio artifacts, suggesting that this conversion process is exceptionally smooth. Generally speaking, however, matching the sample rates between Windows and Cubase is preferable to avoid unnecessary processing.
Steps to Send Cubase ASIO Audio to Streaming Software (OBS Studio)
Setting up routing to send DAW audio to streaming software like OBS Studio or communication apps like Discord has historically been a notorious trouble spot in Windows environments.
This is due to a structural barrier: the standard Windows audio subsystem cannot directly capture the high-quality, low-latency “ASIO output” utilized by professional DAWs (the “ASIO wall”).
In this section, I will explain how to bypass this ASIO wall using Sessionwire, and how to leverage Cubase Pro’s powerful “Control Room” feature to establish the most hands-off, set-and-forget streaming workflow possible.
How Sessionwire Bypasses the ASIO Wall
Conventional virtual mixers (like VoiceMeeter Banana) operate by intercepting the DAW’s ASIO output on the mixer side first, and then distributing it to the OS’s recording devices.
Routing via Sessionwire significantly shortens this signal path. The “Sessionwire Send” plugin, inserted at any point within your DAW, delivers the digital signal directly to “To SW,” which serves as the virtual recording input on the OS side.
This allows you to send your DAW’s pristine ASIO sound straight into OBS without the Windows system mixer intervening at all.
Cubase Configuration (Using the Control Room is Highly Recommended)
The most intuitive place to insert the plugin might seem to be the Master Out (Stereo Out) insert slots.
However, doing so means you would have to re-insert the plugin every single time you start a new project. Furthermore, if you forget to bypass the plugin during audio export (mixdown), it can lead to unexpected issues or unintended signal routing in your exported files.
Utilizing the “Control Room” feature built into Cubase Pro beautifully solves this dilemma.
Setup Procedure
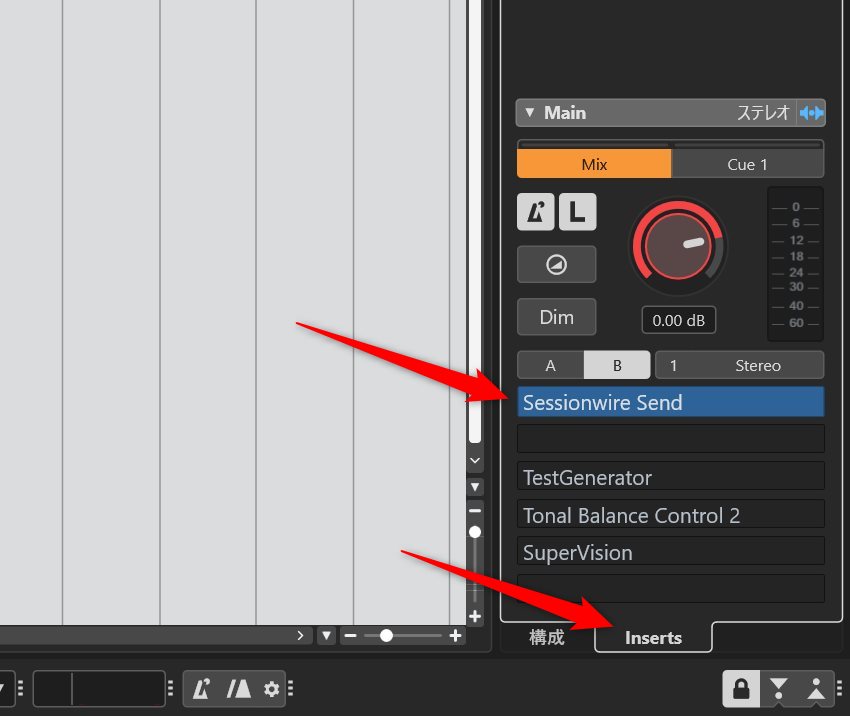
Open the Right Zone of the Project Window, and select/display the Control Room (CR) tab.
Select the “Inserts” tab at the bottom of the Control Room panel, and insert “Sessionwire Send” into an available slot (see the figure below).
Advantages of Inserting into the Control Room
Plugins inserted into the Control Room are anchored globally to the output environment of the Cubase application itself, rather than being saved inside individual project files (.cpr) (they are recorded in a dedicated preference file).
This means that regardless of whether you open a very old project or create a brand-new blank one, simply having Cubase running automatically activates the background audio transmission line to OBS.
The hassle of reconfiguring the routing per project drops to absolute zero, allowing you to completely forget the setup is even there.
OBS-Side Capture Settings: Complete in 2 Steps
The procedure simply involves capturing the audio sent from Cubase via the plugin to the virtual driver “To SW” as a standard audio source in OBS.
- Launch OBS Studio and add an “Audio Input Capture” source in the “Sources” section (naming it something like “Cubase Audio” is recommended).
- In the properties window of the newly added “Audio Input Capture,” select “To SW (Sessionwire)” from the “Device” drop-down menu, and click “OK.”
With just this, the high-quality ASIO sound played back in Cubase is fed directly into OBS’s audio mixer in real time.
Tips: Regarding “Exclusive Mode” Settings
To get straight to the point, leaving Windows at its default setting (Exclusive Mode enabled) is generally perfectly fine. Below is the rationale behind this conclusion.
Sessionwire’s official manual recommends unchecking “Allow applications to take exclusive control of this device” (Exclusive Mode) in the Windows Sound settings.
This recommendation likely stems from the fact that Sessionwire operates under the assumption that multiple applications and audio devices will handle audio simultaneously. Preventing other software from monopolizing the device helps avoid driver conflicts.
However, turning off Exclusive Mode means you will lose access to bit-perfect, low-latency exclusive playback features (like WASAPI Exclusive) offered by certain standalone audio players or specialized recording/measurement software.
Therefore, it is entirely reasonable to start out with the Windows default setting (Exclusive Mode enabled) and only consider changing it if you encounter clear device conflicts or errors that point to exclusive mode as the culprit.
The critical factor is not the setting itself, but whether another application is actively monopolizing the device. While the default setting usually works fine, disabling Exclusive Mode can serve as an effective troubleshooting step if you suspect an audio device conflict.
In fact, in my own environment (Windows 10, Cubase Pro 15.0.30, Roland Rubix22), the setup runs perfectly stable with Exclusive Mode enabled.
Steps to Capture Desktop Audio into Cubase
Normally, to record internal computer audio (desktop audio) into a DAW, you had to either physically patch the audio interface’s outputs back into its inputs using cables (physical loopback), or use an internal software utility that simulates this process (hardware loopback function).
Alternatively, you could route via audio files recorded using Audacity’s WASAPI loopback mode, but any approach demanded a fair amount of tedious exporting and workarounds.
With Sessionwire, however, you can build a “direct pipeline” that draws desktop audio right into Cubase as a pristine digital signal.
This establishes a degradation-free transmission environment that is not bound by the physical constraints of your hardware specifications.
Capture Steps via Simple Routing
Routing Flow

[OS Side] Windows Playback Device: "From SW"
 ↓
[Cubase Receiver Stage] Input Bus (Sessionwire Receive Plugin Inserted)
 │ *Designated as the input source for the recording track
 ↓
[Recording Stage] New Audio Track (For waveform recording)
Step 1: OS-Side Settings (Sending the Audio)
Click the speaker icon in the bottom right of the Windows taskbar and open the playback device selection.
Select “From SW (Sessionwire)” as the output device for playback from Spotify, web browsers, or other desktop audio sources.
Step 2: Cubase Receiver Settings (Receiving the Audio)
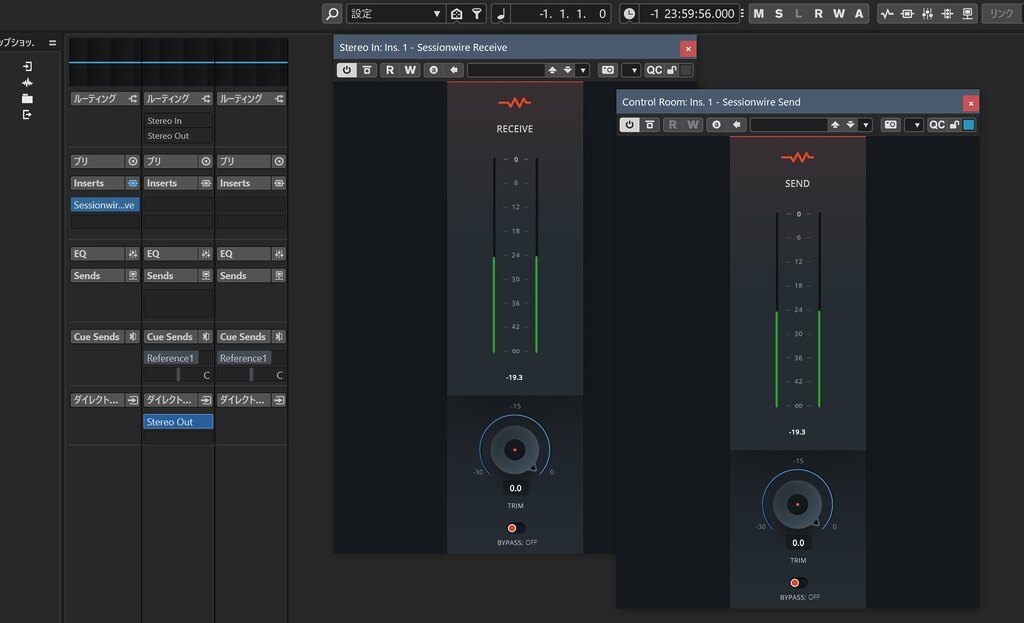
Open the MixConsole in Cubase, and insert the “Sessionwire Receive” plugin into an insert slot on your “Input Bus (Stereo In).”
At this stage, the audio from the OS side will begin flowing into Cubase via the plugin. Verify that the mixer meters bounce in sync with your desktop audio.
Step 3: Recording Track Configuration and Monitoring
Finally, set up an “Audio Track” to actually monitor and record the incoming waveform.
In the “Input Routing” settings of this recording track, select the “Input Bus” where you just inserted the plugin.
Turning on monitoring (the speaker icon) for this recording track should now allow you to hear the audio from the OS side. From here, you are free to record and play back as you wish.
Advanced Routing Options
While the explanation above covers inserting the plugin into an Input Bus, it is also highly feasible to use it within a Group Track or FX Track.
By specifying those tracks in the “Input Routing” settings of the destination audio track, you can record and play back just as you would with an Input Bus.
Furthermore, if you only need playback/monitoring without recording, you can simply insert the plugin directly onto an audio track and turn on monitoring.
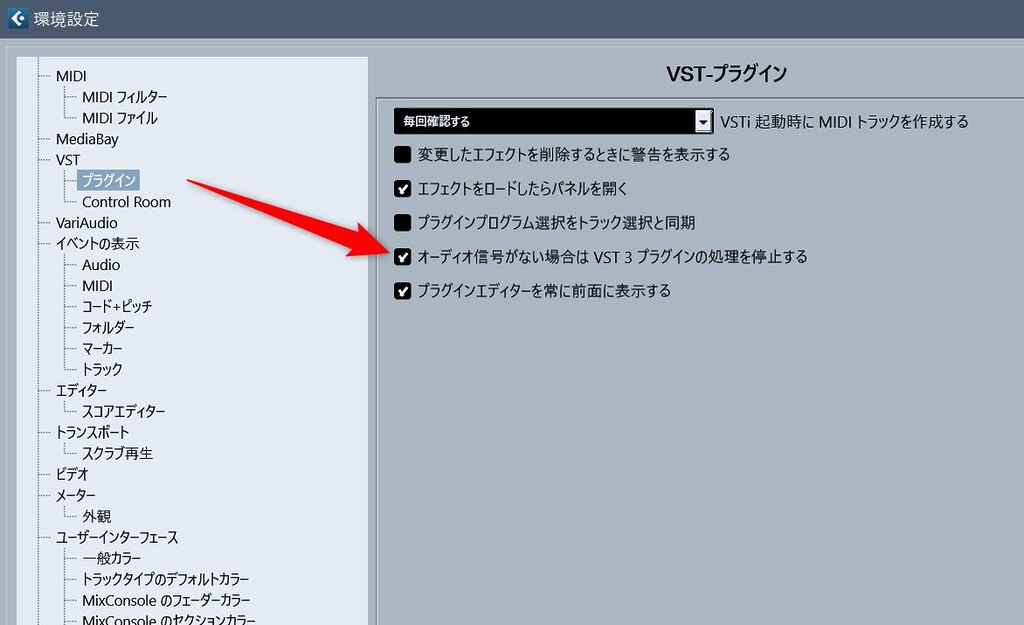
However, to implement these methods, you must turn off “Suspend VST 3 plug-in processing when no audio signals are received” in Preferences > VST > Plug-ins.
If this setting remains enabled, Cubase deems the track to be in a silent state because there is no conventional audio data feeding into it, and no audio from Sessionwire will play back. This preference is likely responsible for the vast majority of cases where Sessionwire fails to output sound in Cubase.
Keep in mind that this setting directly impacts CPU load by keeping VST3 processing active on silent tracks, so make your decision based on your project complexity and typical workflow requirements.
Interestingly, when inserted into an Input Bus, the connection will not drop even if this preference is enabled. This is because Cubase recognizes a bus track connected to an active hardware audio device as permanently “having a signal.”
Consider the current utilization of your audio interface’s input buses and whether your system can afford to disable VST3 processing suspension globally, and then choose the optimal insert location for the Sessionwire plugin in your environment.
For the record, in my own environment, I keep this preference enabled and insert the plugin into the Input Bus (Stereo In). When using external hardware inputs, I simply bypass the plugin (since leaving it active would feed desktop audio into the track instead of your external microphone or instrument signal, you will want to bypass the plugin during actual tracking sessions).
Conclusion: Streamlined with Sessionwire Alone—A Modern, Intelligent Audio Infrastructure
Audio routing in Windows environments has historically forced a choice between the constant presence of a complex, heavy virtual mixer or absolute dependency on hardware loopback specifications.
Amidst this landscape, the Sessionwire Plugin Suite tackles this routing architecture beautifully—requiring no physical loopbacks, zero financial cost, and minimal CPU overhead.
For Cubase Pro users in particular, leveraging the Control Room as a permanent transmission output completely eliminates the need to rebuild your routing path project by project.
Naturally, for complex setups demanding extensive audio networks or multi-channel cross-application routing, virtual mixer software like VoiceMeeter Banana remains the right tool for the job.
However, as long as your primary application consists of standard tasks—such as integrating Cubase with OBS Studio or recording/playing back desktop audio—Sessionwire alone provides an incredibly reliable environment and serves as an exceptional alternative to VoiceMeeter Banana.
Before straining your brain over heavy external mixer configurations or looking into a new audio interface just for routing features, try incorporating this completely free plugin suite into your DAW first.
You will gain a simple, elegant audio infrastructure where the boundary between your desktop audio and DAW blends seamlessly.